
Liberty Gun Safe vs. Concealment Safes: Why Concealment Wins
- by Ad Team Analytics
-
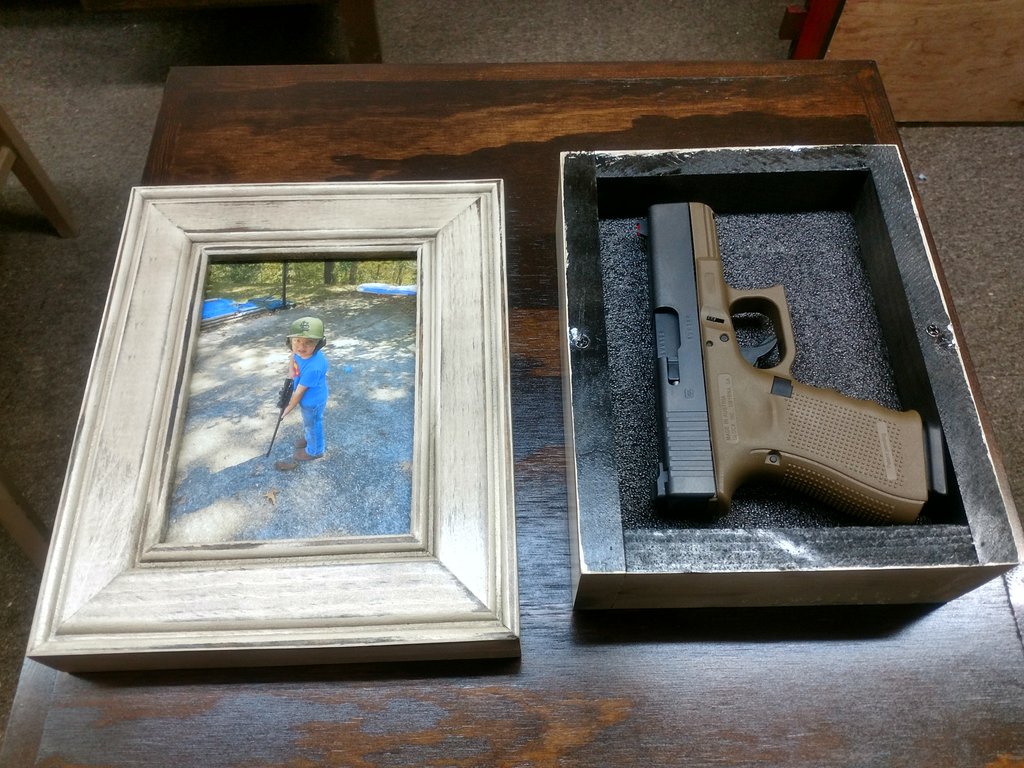
When searching for secure firearm storage, many gun owners instinctively think of large steel boxes bolted to basement floors. Traditional safe manufacturers have dominated the market for decades with this one-size-fits-all approach. But what if there's a way that prioritizes both security and integration into your actual living space?
Liberty Home Concealment represents a fundamentally different philosophy in gun storage. While traditional safes treat your firearms like vault contents requiring fortress-level protection, concealment furniture recognizes that modern gun owners need something smarter: quick access, complete discretion, and furniture that enhances rather than clutters their homes.
Understanding the Liberty Difference
Let's be clear from the start: Liberty Home Concealment is not Liberty Safe, the traditional safe manufacturer. We're something entirely different — and many would argue, significantly better for everyday gun owners. While traditional safe companies build larger and heavier boxes, Liberty Home Concealment crafts American-made concealment furniture that actually belongs in your home.
The name "Liberty" isn't just patriotic branding — it represents freedom from the limitations of conventional thinking about gun storage. Freedom to access your firearms quickly. Freedom from dedicating entire closets to steel boxes. Freedom to maintain beautiful home aesthetics while practicing responsible firearm ownership.
The Traditional Safe Problem
Traditional gun safes come with inherent shortcomings that manufacturers rarely acknowledge. Yes, they offer protection and store multiple long guns, but at what cost?
Space Domination
Most traditional safes require significant floor space — typically 20-30 square feet when you account for door swing clearance. In homes where square footage comes at a premium, dedicating a closet or corner to a 500-pound steel box feels increasingly impractical. Many gun owners end up relegating safes to basements or garages, defeating the purpose of quick access during emergencies.
Aesthetic Disruption
Let's address the elephant in the room: traditional safes are ugly. Even the most expensive models look like commercial equipment rather than residential furniture. They announce "GUNS HERE" to anyone who sees them—family, friends, contractors, or potential intruders casing your home.
Access Speed Challenges
During high-stress situations, fumbling with combination dials or electronic keypads while your hands shake isn't ideal. Traditional safes prioritize vault-level security over realistic home defense scenarios, creating barriers between you and your firearm when seconds matter most.
Gun Safe Comparison: Traditional vs. Concealment
When conducting an honest gun safe comparison, we need to evaluate what actually matters for residential use rather than what safe manufacturers want to sell you.
Security Through Obscurity
Traditional safe marketing emphasizes thick steel and complex locking mechanisms, but here's the truth: the best security is invisibility. A 12-gauge steel door isn’t as secure if criminals know exactly where to find it. Concealment safes leverage the oldest security principle — what intruders can't see, they can't target.
A concealment coffee table in your living room or a Patriot shelf on your wall doesn't register as a security device. This psychological advantage often proves more effective than adding another inch of steel to a safe everyone can identify.
Real-World Accessibility
Consider these scenarios:
-
3 AM emergency: Do you want to stumble to a safe in another room, punch in a code under stress, and fumble with a heavy door? Or would you prefer reaching to your nightstand, where concealment furniture provides instant access?
-
Multiple access points: Traditional safes force you to choose one location. Concealment furniture allows strategic placement throughout your home — bedroom, living room, home office- creating a layered security approach
-
Daily carry transitions: Arriving home and securing your EDC firearm should be effortless. Concealment decor makes this routine seamless rather than a conscious security task
Integration vs. Intrusion
Traditional safes intrude on your living space. They demand accommodation — you arrange your home around them. Quality concealment furniture does the opposite: it enhances your existing aesthetic while providing superior functionality.
The American flag concealment collection exemplifies this philosophy perfectly. These pieces celebrate patriotic values while serving practical purposes. They're conversation pieces that deflect rather than attract attention to their true function.
Addressing Common Concealment Concerns
Skeptics of concealment safes often raise predictable objections. Let's address them directly.
"But what about fire protection?"
Traditional safes excel at fire protection — no argument there. However, most residential gun owners don't store irreplaceable documents or heirlooms in their gun safes. They store tools designed for protection and sport. Firearms can be replaced; your ability to access them during emergencies cannot.
For long-term storage of valuable firearms or collections, traditional safes make sense. For daily-carry handguns and home defense weapons, quick access trumps fire ratings you'll statistically never need.
"Won't criminals figure out concealment furniture?"
This concern assumes burglars conduct thorough searches with unlimited time. Reality proves otherwise. Most break-ins last 8-12 minutes — criminals grab obvious valuables and leave. A laptop on your desk gets stolen; a laptop-sized compartment hidden in decorative furniture gets overlooked.
Moreover, even if criminals become aware that concealment furniture exists, identifying which specific pieces in your home contain compartments requires knowledge they don't possess. Your concealment shelf looks identical to a decorative shelf because it is a decorative shelf—just with a hidden bonus.
"How secure are the locking mechanisms?"
Modern concealment furniture uses the same magnetic and RFID technology found in high-end commercial security systems. These mechanisms provide excellent security against unauthorized access while offering instantaneous access for authorized users. No combinations to forget, no keys to lose, no batteries to die at the worst moment.
The American-Made Advantage
Liberty Home Concealment's commitment to American manufacturing isn't just marketing — it's fundamental to product quality. Every piece of concealment furniture is crafted domestically using premium materials and time-tested woodworking techniques.
This matters for several reasons:
-
Quality control: Direct oversight of manufacturing ensures consistent quality
-
Customization: American workshops can accommodate specific requests and modifications that factory production lines cannot
-
Supporting local economy: Your purchase supports American craftsmen and their families rather than foreign manufacturers
-
Sustainability: Domestic production reduces shipping distances and environmental impact
The Liberty Home Concealment story began with recognizing that gun owners deserved better than choosing between security and aesthetics. This vision only works with the quality control that American craftsmanship provides.
Choosing the Right Liberty Solution
Not everyone needs the same storage solution. Liberty Home Concealment offers options for different scenarios:
For Bedside Access
Quick access nightstands combine the functionality you'd expect from bedroom furniture with secure firearm storage. No separate safe to bolt down, no obvious security equipment—just beautiful furniture that happens to protect your family.
For Living Spaces
Coffee tables, shelves, and wall-mounted pieces like the Patriot shelf distribute security throughout your home. This creates multiple access points while maintaining the relaxed aesthetic of well-decorated living spaces.
For Collectors and Enthusiasts
Larger concealment pieces accommodate multiple firearms while displaying them in ways that celebrate rather than hide your interest in firearms. The American flag coffee table serves as both storage and a statement piece about your values.
Beyond the Gun Safe Comparison
Comparing Liberty Home Concealment to traditional safes almost misses the point. We're not offering "better safes"—we're offering better solutions to the real challenges gun owners face. Traditional safe manufacturers optimize for the wrong metrics: weight, steel thickness, and vault-like security appropriate for bank branches but excessive for homes.
Liberty Home Concealment optimizes for what actually matters:
-
Daily usability: Storage solutions you'll consistently use rather than bypass for convenience
-
Home integration: Furniture that enhances your space aesthetically while providing security
-
Practical access: Instant availability during emergencies without compromising safety during normal circumstances
-
Distributed security: Multiple strategic access points rather than all eggs in one heavy basket
Making the Liberty Choice
The search for a "Liberty gun safe" led you here for a reason. Perhaps you're reconsidering whether traditional safe solutions really address your needs. Maybe you're tired of choosing between accessibility and responsibility. Or possibly you're just ready for storage solutions that respect both your firearms and your home.
Liberty Home Concealment represents an evolution in thinking about firearm storage. We're not abandoning security—we're making it smarter, more practical, and infinitely more livable. Browse the complete concealment furniture collection and discover why thousands of gun owners are choosing concealment over conventional safes.
Your home deserves furniture that works as hard as you do. Your firearms deserve storage that provides both protection and immediate accessibility. And you deserve the liberty to make choices that serve your actual needs rather than what traditional safe manufacturers think you should buy.
Frequently Asked Questions
What makes Liberty Home Concealment different from Liberty Safe?
Liberty Home Concealment is a completely different company specializing in concealment furniture rather than traditional steel safes. While Liberty Safe manufactures conventional gun safes, Liberty Home Concealment creates American-made concealment furniture that integrates seamlessly into your home. Our approach prioritizes discretion, quick access, and aesthetic appeal over the bulky fortress-style storage of traditional safes.
Are concealment safes as secure as traditional gun safes?
Concealment safes offer different but equally effective security through the principle of "security through obscurity." While traditional safes rely on thick steel and complex locks, concealment furniture prevents theft by being unidentifiable as a security device. Criminals can't target what they can't recognize. Additionally, modern concealment pieces like the Patriot shelf use magnetic and RFID locking mechanisms that provide excellent protection against unauthorized access.
How do I compare different gun safe options?
When conducting a gun safe comparison, consider your actual needs rather than manufacturer marketing. Ask yourself: Do you need fire protection for a valuable collection, or quick access for home defense? Do you have space for a 500-pound safe, or would concealment decor better serve your living situation? Can you access a traditional safe quickly during emergencies, or would bedside concealment furniture provide faster access? Honest answers usually favor concealment solutions for daily-carry and home defense firearms.
What types of concealment safes does Liberty Home Concealment offer?
Liberty Home Concealment offers a comprehensive range of concealment furniture, including coffee tables, wall shelves, nightstands, picture frames, clocks, and patriotic pieces like American flag concealment furniture. Each piece serves as functional furniture while providing secure firearm storage, allowing you to place security throughout your home rather than in a single location.
Is concealment furniture made in America?
Yes, all Liberty Home Concealment products are proudly American-made using premium domestic materials and craftsmanship. This commitment to domestic manufacturing ensures superior quality control, supports American workers, and allows for customization impossible with mass-produced overseas products. Learn more about Liberty's manufacturing philosophy on the About Us page.
Can concealment furniture hold multiple firearms?
Absolutely. Larger pieces like the American flag concealment coffee table can accommodate multiple handguns or even compact rifles, while smaller concealment decor items are perfect for single handguns. The advantage of concealment furniture is that you can distribute multiple pieces throughout your home, creating several secure access points rather than storing everything in one location.
